Friday, April 27, 2012

Fabric Flower Hair Clips


        The fabric flowers are called yoyo's. I learned how to make them when I was little and I have always loved them! You can put them on everything and embellish them further with buttons or beads in the center.

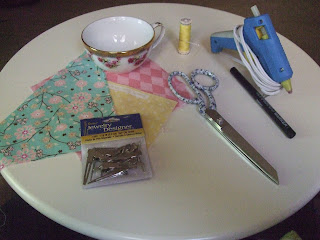
Supplies"

Blank hair clips (available at any craft store)
Fabric scraps
Needle and thread
pen
Hot glue gun
A circle to trace that is approx. 4'' in diameter
Scissors


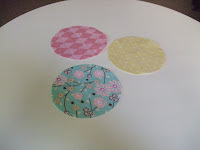
1)   Trace circle onto fabric and cut out.


2)   Double thread your needle and knot it at the end. Sew a running stitch 1/4'' away from the edge of the fabric (your stitches should be approx. 1/4'' long)


3)   Pull the thread to create a flower shape. Before it is pulled all the way tight, tuck the raw edge of the fabric to the inside. Pull the thread tight.


4)   Take a few stitched through the middle of the flower then pull to the back and knot it. Cut off excess thread.


5)   Repeat...


6)   Hot glue the clips to the back of the flowers.


Wednesday, April 25, 2012

Cardboard Victorian Playhouse


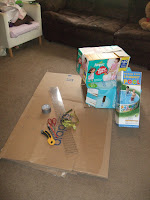
I started with a bunch of boxes and just started cutting.


      I used a big box as a base and went on from there....

      The bay window is a smaller box with one side cut off and flipped inside out so the brown side is showing. I used a knife to cut out the windows after drawing the placement on the back side with a pencil. I used the cut of piece to create it's roof then traced it's shape onto the big box and cut it out. 

     The front door is also an add on of a smaller box with two sides and the top cut off. I traced the shape of the smaller box onto the main box and cut that part out. I used the flap from the main box to come down to be it's roof. The door was from another piece I cut to size. I used a knife to cut out the door details. 

    The roof is made only with the original flaps of the main box (3 of them) I cut the edges of the longer flaps at an angle and taped the remaining flap to it.  (so the top is open)

    I attached all the pieces with duct tape! Lots of duct tape. I tried to tape from the inside when I could. 

    Both to add detail and hide some tape I put shingles on the roof. I made them with fleece I cut out a bunch of rectangles (with out being worried about exact measurements or neatness) and I hot glued them on from the bottom up.


Friday, April 20, 2012

Neapolitan Popsicle


Ingredients:
Milk
Strawberry syrup
Nesquick or Chocolate syrup
Vanilla extract


                Mix strawberry syrup and milk in a separate cup and pour in each popsicle form filling 1/3 of the way. Put tops on and freeze for about an hour. Mix the chocolate milk and remove popsicles form freezer, pour the chocolate milk another 1/3rd of the way up and replace tops again ( this is important to form a space for the stick) Freeze for another hour. Mix a drop of the vanilla extract into another cup of milk. One at a time pull off the tops of the popsicle forms (this is harder now since the 2nd layer is frozen around the end of the stick) quickly fill the rest of the way with the vanilla milk and replace the top (if you wait to long the spot the stick came out of will refreeze and it will be difficult to replace the top). Freeze one more hour and enjoy!


Thursday, April 19, 2012

Construction Paper Italian Dinner

      My daughter loves to help me cook! I got this idea today during a play date when the girls were making "soup" with various items around the house (I had given them bowls and big spoons) they loved it!


      I just used paper so that when she is over playing with it I can just scoop it into the recycling. I found that the living room floor is the best place for this activity since I can just vacuum when she is done. 


Wednesday, April 18, 2012

Homemade Glass Cleaner

        This is easy, cheap and I like that it's all natural since my daughter likes to press her face against the window waiting for daddy to get home!

Supplies:

1 cup vinegar
1 cup water
3 Tbs lemon juice
Spray bottle 


Mix ingredients in bottle and shake. Ready to go!


Tuesday, April 17, 2012

Ruffle Skirt for Spring

sewing tutorial 


This is for a size 3T skirt, I will include
 dimensions for different sizes at the bottom
 Supplies:
 3/4 yard cotton fabric
1/2 yard elastic (3/4'' wide)
Matching thread
Sewing machine
Scissors
Pins
Ruler 


 Instructions:

 1) Pre-wash your fabric then iron. Fold in half so the selvedge's are matching (finished or un-cut edges) 


  2) Cut 2 11'' wide strips and one 4'' wide strip. One side is folded so each of these strips is twice as lone. be sure not to cut the fold.


 3) Take the 4'' strip and cut a 30'' length from it.


 4) Fold the 30'' strip in half right sides together (it should be inside out). Pin the short side and sew with a 1/2'' seam allowance (the stitching should be 1/2'' away from the edge of the fabric.


 5) Iron the  seam allowance open.


 6) If you have a serger, serge one edge otherwise sew a zig zag stitch along the edge of one side. If you have a directional fabric make sure this is the top.


 7) Fold over 1'' to the wrong side of the fabric. Sew down right along the edge leaving a 1'' opening. Put this piece aside.


8) Take the two large pieces and place them right sides together and pin together the two shorter sides and sew together with a 1/2'' seam allowance.


 9) Iron open both seams


 10) Fold over 1/2'' along the whole bottom edge and iron. fold over an additional 1/2'' and iron again.


 11) Sew 


Gathering...


12) Sew 3 (YES 3) rows of basting (the longest length stitch your machine can do) along the top of the skirt.Make sure to leave long threads on each row, do not back tack, do not let rows intersect and leave 1'' between the beginning and end of each row. pick up the top thread of each row and hold securely.


  13) Slide the fabric along the threads

 14) Continue sliding and moving the fabric along the threads.


 15)  Continue this process until the skirt maches the waistband piece and the gathers are evenly distributed.


 16) Pin right sides together the unfolded side of the waistband piece and the ruffled part of the skirt.


 17) Sew around with 1/2 seam allowance (be sure to set your machine back to a normal stitch).


 18) Fold upward and remove and basting stiching that may be showing.


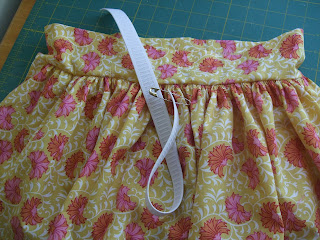
 19) Take a 17"" (or a piece 1'' smaller then the child's waist) and attach a large sturdy safety pin.

 20) Pull the elastic through the caseing created earlier. Make sure there are no folds and overlap the ends of the elastic and sew together.


 21) Pull the elastic inside the skirt ans sew closed the opening... All done :-)


Other size options
12M:  You will need two 9'' strips and one 3'' strip. Cut the 3'' strip to 26''
2T: You will need two 10'' strips and one 4'' strip. Cut the 4'' strip to 28''
3T: See Above
4T: Buy 1 yard of fabric. You will need two 12'' strips and one 4'' strip. Cut the 4'' strip to 32''
5T: Buy 1 yard of fabric. You will need two 14'' strips and one 4'' strip. Cut the 4'' strip to 34''

If you have a request for a special size let me know!


Thursday, April 12, 2012

Homemade Shampoo/ Conditioner

         I have a really lot of curly hair and I have developed this recipe to work for me. I spent about $20 for all the ingredients and it has been 6 months and I still have tons more. For me an annual savings of approximately $200! Also this shampoo/conditioner works better then any kind I have ever bought.  I used to use twice as much conditioner as shampoo but now I just use this!

The Recipe:


6 cups water
1 Bar of moisturizing soap (I use dove)
60 drops Essential oil (I use rose- any kind is fine, choose a scent you love, I bought mine at Whole Foods)
6 Tbs Aloe Vera gel
6 tsp Vitamin E Oil (I found mine in the vitamin aisle at Target)
6 Tbs Apple Cider Vinegar

Makes about 1.5 Quarts

Directions:

 1) Grate the bar of soap.


 2)  Add 6 cups of water and put it on the stove on medium heat stirring continuously until the grated soap has dissolved completely (5-10 minutes).


 3) Remove from heat and let cool a little, then dd the rest of the ingredients. 


 4) Whisk the ingredients together.


 5) Store the shampoo/ conditioner in an air tight container, I use a recycled potato salad tub! The shampoo can come out watery so I use a spray bottle to apply it, shake before each use. Or keep it in a recycled shampoo bottle.


  6) All Done!

Using this or any natural shampoo is a different experience then regular shampoo. I recommend commenting to it for a week to start. This shampoo does not lather up and just feels a bit different, however it works (and smells) great!